
Excel for Microsoft 365 Word for Microsoft 365 Outlook for Microsoft 365 PowerPoint for Microsoft 365 Project Online Desktop Client Excel for Microsoft 365 for Mac Word for Microsoft 365 for Mac PowerPoint for Microsoft 365 for Mac Excel 2021 Word 2021 Outlook 2021 PowerPoint 2021 Project Professional 2021 Project Standard 2021 Excel 2021 for Mac Word 2021 for Mac PowerPoint 2021 for Mac Excel 2019 Word 2019 Outlook 2019 PowerPoint 2019 Project Professional 2019 Project Standard 2019 Excel 2019 for Mac Word 2019 for Mac PowerPoint 2019 for Mac Excel 2016 Word 2016 Outlook 2016 PowerPoint 2016 Project Professional 2016 Project Standard 2016 More. Less
You can reduce the file size and save disk space by compressing pictures in your document. The compression options reduce both the file size and picture dimensions based on how you intend to use the picture, such as viewing on screen or in an email message. You can compress all pictures in the file or just the ones that you select.
These features aren't available in Microsoft 365 for the web, but only the desktop versions of the Office apps.
You can send files with high-quality images easily, and without file limits, by saving to the cloud and then sharing files from OneDrive.
When you don't need every single pixel in an image to get an acceptable version of it, you can compress pictures to make the file size smaller.
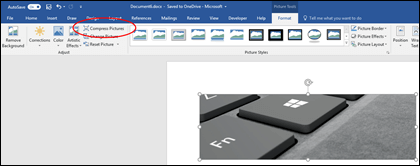
Compress Pictures.

If you do not see the Picture Tools - Format tab, make sure that you selected a picture. You may have to double-click the picture to select it and open the Format tab. Also, depending on your screen size, you might only see the icons for the Adjust group. The Compress Pictures button appears without a label.
Click the headings below for more information
Change default picture resolution for all pictures in a documentImportant: This setting applies only to pictures in the current document or the document selected in the list next to Image Size and Quality. To make it the default for all new documents change the drop down.
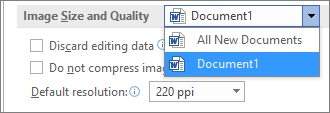
Any info on the changes you've made to your picture are stored in your file. You can reduce the size of your file by deleting this editing data, but if you want to undo your edits you will need to reinsert the picture.
Note: This feature is not available in Microsoft Project 2016.
Note: This setting applies only to pictures in the current document, or the document selected in the list next to Image Size and Quality.


To compress only selected pictures, hold down SHIFT, click the pictures you want to compress, and then click Compress Pictures
Tip: If you have cropped any pictures, you can reduce the file size even more by selecting the Delete cropped areas of pictures check box.
Note: If you use the File menu to choose all pictures in step 1, these options will be unavailable. Compression will be applied to all pictures in your document.